Practice Routines for Pickleball
The idea of practice is to improve your game so use proper form and technique when practicing. We will not be explaining correct form in these instructions, just how and where to hit your practice shots. And remember “Practice does not make perfect” because if you practice wrong you will play wrong.
“Perfect Practice Makes Perfect”
The Serve
Whether you practice a hard drive serve, a medium paced serve, slow serve or lob. Forehand or backhand. Here is a routine you can use for any serve you wish to work on.
First you’ll need 10-30 Pickleballs, more if you like. (or a practice partner, which is preferred) Have the balls in a bucket of some kind and easy to pull out and get ready to start your practice.
Let’s first identify the starting positions and target locations.
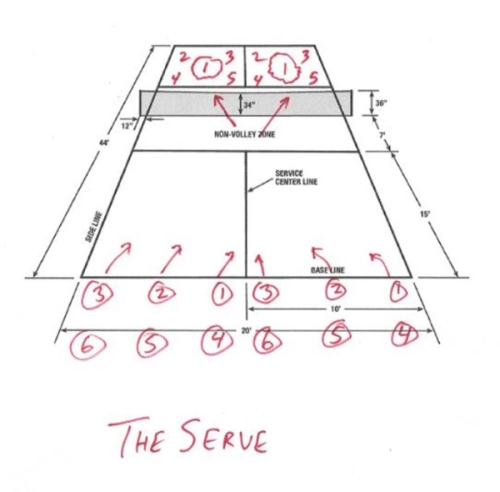 Positions - from behind the line there are 6 main positions.
- At the line Far right
- At the line Center
- At the line Far left
- Behind the line Far right
- Behind the line center
- Behind the line far left
When done with about 30 serves from the right side, then switch to the left side to serve. (For positions 4-6 you can start your serve 1-4 feet behind the line, what ever feels right for you) (The main reason for starting a few feet back is to take a step forward and also if you hit a hard serve a little too hard the chances of it going too far are much less and it has a better chance of staying in. This is the way the top players serve.)
Target Locations - there are 5 main target locations
- Center of the receiving area (about a 5-6 foot circle)
- Left corner past the center
- Right corner past the center
- Left corner before the center
- Right corner before the center
Hit about 5 balls from each starting point into each of the receiving areas this would give you a total of 30 serves for all the starting areas, and 180 serves overall. Make a mental note of how many you think were successful. If you want to record it on a chart to compare and track your progress over time that would be helpful.
For the Center receiving area (1) you should be successful 100% of the time from all starting positions. For the other 4 receiving areas (2-5) you should be successful at least 80% of the time and eventually 100%. Successful means making a good serve, not necessarily hitting the target area. But you do want it to be fairly close.
If you are a backhand server all the same areas apply.
The Return
The second shot (or the return). Ideally you want to return the serve deep and in the middle, but sometimes you want to return the serve to the left or right opponent. Especially if one of the opponents seems to have a difficult time doing a third shot drop and makes more mistakes than the other player or stays back most of the time.
The return can be one of four main types of returns. A hard return, (not recommended), A return with some pace on it but not too fast, and a medium speed shot. A slow dink type second shot is also not normally recommended and if you do this shot you allow your opponent to get to the net sooner and will have a much easier third shot drop. Also try some returns with various types of spin for variety.
There are three positions to practice the second shot from, the right side, the center and the left side. And you must practice a forehand and a backhand.
If you are practicing alone, just toss the ball up a few feet let it bounce and strike the ball. You want it to be about 2-3 feet high when it bounces to simulate the serve height. If you have a partner to serve it to you that would be ideal. Have them serve it to you at one of the three positions.
In the first position on the right hit the ball with the forehand to the center and in the back 1/3 of the court about 5 times.
Then hit it to the left in the back 1/3 of the court about 5 times. And finally hit it to the right in the back 1/3 of the court about 5 times.
Then do the same thing from the center, then the right.
Repeat everything with a backhand stroke.
You should be successful 90-100% of the time, Eventually 100%.
Success is hitting within the target area, ie, the back 1/3 of the court.
The Third Shot Drop
Very similar to the Return of serve except you want to have the ball land in the kitchen instead of the back 1/3 So all the positions to hit the ball are the same, Practice both forehand and backhand. You should be successful 90-100% of the time. Eventually nearly 100%. You can also practice the Third Shot drive (a hard shot) and Third Shot pass (a medium speed shot) too using the basics of this routine.
Practice against a Wall
By now you are starting to get the idea of what a practice routine is or can be. Let’s try a drill now that is a little different and does not require a net or a court. All you need is a wall. If you have two walls together that has a 90 degree angle that would be better, Like a racquetball court.
If you have some blue painters tape take a 3 inch strip and place it on the wall at the net height 34 inches. And another one 12 inches above that and another one 24 inches above that. Stand about 20 feet back and hit the ball above the net and below the first line. Not too hard but with some good pace.
Just drop the ball and hit it out of the air like a serve or return of serve. You can even drop it and bounce it to simulate a serve or return shot to you. This will give you good practice hitting a drive shot and avoid hitting the net. Do this 10 times forehand, 10 times backhand and repeat 5-10 times more.
Then hit the ball with less pace between the top two lines simulating a third shot drop, you can even put some tape on the ground about 4 feet away from the wall to see if it drops in. Of course it won’t bounce back very far so the 4 foot distance will simulate the 7 foot kitchen area.
Here’s another practice routine you can do if you have two walls. Put tape on both walls at net height 34 inches about 4 feet from the corner. Hit the ball forehanded at the left wall about 2-3 feet above the net, let it bounce then hit the ball backhanded at the right wall about 2-3 feet above the net. Do this as many times as you can until you mess up. This practice drill teaches you ball control for your dinking game and your soft attack game.
The Dink
You will need a partner but you can hit against a wall too but it’s not as affective.
For the first exercise dink the ball back and forth with your partner into the kitchen area, 10, 20, 30, 50, 100 times without a miss if possible. Practice forehand and backhand dinks. They can be done during the same session.
For the second exercise dink the ball from the extreme left to the right just over the net back and forth for 10, 20 , 30 times without a miss. Then go from right to left. And be sure to practice both directions with forehand and backhand strokes. For all your dink exercises don’t be tempted to hit a kill shot when your practice partner leaves a dink in an attack opportunity. This is dink practice. But keep a note of it for future reference during a game.
The Attack shot
This really requires two people. One person will hit a shot at you that will simulate a poor shot, up in the zone either to your right, left or directly at you. You must react correctly and hit the ball in an attack strike, hard enough to get it past your opponent. The best place is at their feet or past them and out of reach. If you aim at their feet you will have a better chance of avoiding hitting into the net or flying out of bounds, Both of these usually happen when you over strike the ball. Likewise if you hit it too softly they will have a better chance of returning the shot. Do this 30 times, 10 times to the left of the court, 10 to the right of the court and 10 right in the middle all shots should be at their feet. (ie foot level on the court or about half way between the kitchen and the back line.
Then repeat everything for a backhand attack shot.
The Defense (aka Counter Attack)
Again this will require a partner to practice. You can simulate it hitting against a wall but it is difficult because of the way the ball bounces back off the wall will not give you a true trajectory that will benefit your practice as much as someone to hit it to you.
The person hitting the attack ball should stand right at the kitchen line and hit the ball at nine different target areas to you.
- directly at the person about chest high
- directly about waist high
- directly at the feet and hitting the ground first
- to your forehand about chest high
- to your forehand about waist high
- forehand at the feet and hitting the ground first
- to your backhand about chest high
- backhand about waist high
- backhand at the feet and hitting the ground first
At first you should hit the ball softly so the person has a chance to feel what the return feels like and how to actually hit it. Hit the ball to their forehand first
As you become more proficient you can begin hitting the ball back with a little more force each practice session. This will take time to become proficient at hitting a consistent defense return. It could take weeks.
OK so how should you make this defensive return. Ideally you want it to go back over the net (well this is obvious) but you also do not want it to POP UP so they can hit an easy kill shot. You want it to go over the net soft enough so they can’t execute another attack shot and hopefully in the kitchen or in the middle of the court between your opponents causing them to collide or both try to hit the ball and make a mistake. If the ball is low then they will have to hit a dink shot and they might POP IT UP to you and now you have an opportunity to hit an attack shot on them. Or they just might try to hit a hard shot and it most likely will go into the net or go out.
So there you have the defense practice.
The LOB
You should really only do a lob when both opponents are at the kitchen and nothing else seems to be working or they have just hit a very difficult dink and if you try to dink you will be out of position and vulnerable to an attack kill shot. The lob should be about 9-12 feet high and deep enough to make it to the back 2-5 feet of the court, preferable the back 3 feet. Any shallower and they will have an easy attempt to take it out of the air for an attack kill shot. Once you lob it you better get in position yourself back at the kitchen line.
To practice the lob just stand at the kitchen and lob to the back 1-3 feet of the court. Do this 30 times the first session and increase the reps as you become more successful up to 100 times eventually, this could take a few weeks. Practice both forehand and backhand lobs. You should be successful 90-100% , Eventually 100%. If you get proficient at this you should be able to lob anytime at will.
*** A warning note. If you lob when you are deep in the court it will be easy for your opponent to hit a kill shot against you, especially if the lob is not deep enough.
The Return of the Lob
This is arguably the most difficult shot to master. You can practice this shot alone or with a partner.
Here is the best rule of thumb for who should go after a lob. Assuming both you and your partner are able to make a return of the lob. If the ball goes over your head then your partner should go after it because they have a better angle and can see the ball better. Once they take off, call switch and you need to cover their position. And the same thing applies if the ball goes over your partners’ head you should go after it and call switch
When hitting the ball it should go just over the net and right down the middle, if possible. Hitting down the line on either side reduces your chance for success. But it can be done with practice. It doesn’t matter how hard you hit the ball as long as you make it just over the net because the object is to get it over the net and in play, otherwise the rally is over. Hopefully your partner will be there to pick up any return they make back to your side of the court to give you time to get back and in position for any return to your side of the court.
How to practice a lob return.
By yourself
Stand at the right side of the court at the kitchen, toss the ball over your shoulder 9-12 feet high to the deep left side of the court or you can tap it with your paddle. Run back and strike the ball backhand or forehand whichever one you can get to right in the middle of the court just over the net. Try hitting it backhand and forehand. Do this 10 times. (more eventually). Note: This practice skill is very physically demanding so don’t over-practice in the beginning.
(Also Note: some of the drills earlier will prepare you for this shot. ie, hitting the ball off the wall just above the net and below the 12 inch line.)
Then repeat from the left side of the court at the kitchen to the right side deep.
If you have a partner
They can hit the lob shot instead of you throwing it up.
If you can be successful 50% of the time that would be excellent. Eventually 100%.
Final Thoughts
Obviously you can’t practice all these drills in one day. I would suggest picking one drill to begin with 3 times a week until you become proficient at it. Then move on to another. Once you are proficient at all of them work on the ones that you are having trouble with in your game.
For all these drills set up a schedule for when you will be practicing each type of skill. Don’t practice more than 2 skills during one session. One skill is good, two skills is more than enough. Practice for a total of 20-30 minutes once or twice a week in the beginning. You can increase to 30-60 minutes eventually. Record your practice sessions and your success/attempts and watch yourself improve over just a one month period. And your overall performance during your Pickleball play will also begin to improve. And . . . faster than you think !!!